Print Screen On Macbook
Print Screen On Macbook - Are you a new Mac user and wondering how to take a screenshot? Look no further, as we have compiled a list of 7 different ways in which you can capture your screen on a Mac. Check out the following methods and choose the one that suits you best.
Method 1: Using Keyboard Shortcuts
A. Full Screen Screenshot
Press the “Command + Shift + 3” keys together to capture a full-screen screenshot. Once captured, the image will be saved on your desktop.

B. Partial Screenshot
To capture a partial screenshot, press “Command + Shift + 4” and then use your cursor to select the area of the screen you want to capture. Once you release the cursor, the image will be saved on your desktop.
Method 2: Using The Touch Bar
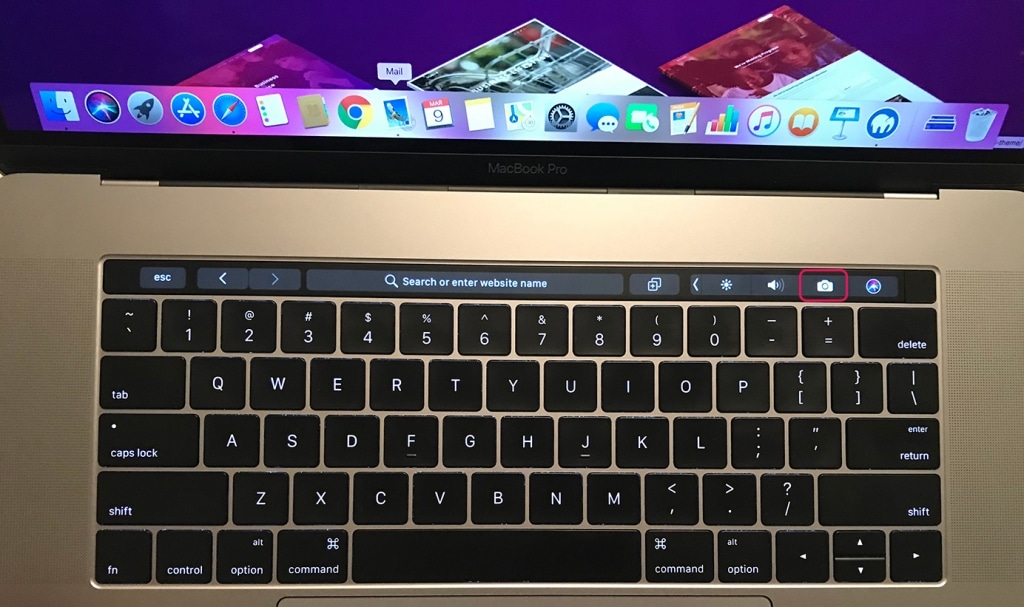
Do you have a Macbook Pro with a Touch Bar? If yes, then capturing a screenshot is just a tap away. Follow these simple steps:
1. Click on the “Screenshot” icon on the Touch Bar.
2. Choose an option from the three screenshot modes: full screen, window or selection.
Method 3: Using Preview
You can also capture a screenshot using Preview. Here’s how:
- Open Preview, click on “File” and then “Take Screenshot”.
- Choose the type of screenshot, such as selection or window.
- Select the area you want to capture, and click on “Capture”.

Method 4: Using Grab
If you want to capture a screenshot of a menu or tooltip, then Grab is the perfect tool for you.
- Go to “Applications”, then “Utilities” and select “Grab”.
- Click on “Capture” and choose the type of screenshot you want: selection, window, screen or timed screen.
- Choose the area of the screen you want to capture and click on “Capture” once again.

Method 5: Using Terminal
Terminal is a powerful tool that can be used to capture screenshots as well. Follow these steps:
- Open Terminal and type in the command “screencapture”.
- Add the necessary flags after the command for the type of screenshot you want to capture.
- Press “Enter” to capture the screenshot.
Method 6: Using Third-Party Apps
There are many third-party apps available on the App Store that can help you take screenshots with additional features. Here are a few popular options:
- Snagit
- Monosnap
- Lightshot
- Jing

Method 7: Using Keyboard Maestro
If you use your Mac for professional purposes, then Keyboard Maestro can be a great tool for automation. You can set up a macro in Keyboard Maestro to take a screenshot with your desired settings.
Now that you know how to take a screenshot on a Mac, here are some additional tips and ideas:
Tip 1: Edit Your Screenshots
You can easily edit your screenshots using the built-in Preview app. You can crop, resize, rotate and annotate your screenshots with ease.
Tip 2: Take Screenshots Of Videos
If you want to take a screenshot of a frame from a video, you can use the keyboard shortcut “Command + Shift + 4” followed by “Space bar”. This will turn the cursor into a camera icon which you can use to capture the desired frame.
Tip 3: Use Keyboard Maestro For Customized Screenshot
With Keyboard Maestro, you can create a macro that captures screenshots with your desired settings. You can customize the resolution, format, filenames and more.
Tip 4: Use The Preview Pane To Quickly View Your Screenshots
If you’re taking a lot of screenshots, it can be tedious to keep opening and closing them to view them. Instead, you can use the Preview pane to quickly view your screenshots without opening them in Preview.
How To Take A Screenshot On A Mac: Summing It Up
Now that you know how to take screenshots on a Mac, it’s time to get clicking. Whether you choose to use the keyboard shortcuts or any of the other methods we listed, capturing a screenshot has never been easier.
So, which method are you going to use? Let us know in the comments below.
View more articles about Print Screen On Macbook
Post a Comment for "Print Screen On Macbook"