Restore On Macbook Pro
Restore On Macbook Pro -
Hey y'all! Are you a proud owner of a MacBook Pro but have been facing issues with its performance? Maybe it's time to restore it and breathe new life into it! Don't worry if you've never done it before, we've got you covered. In this post, we'll walk you through the steps to restore your MacBook Pro with ease. So, grab your Macbook and let's get started!
How to Restore MacBook Pro
Step 1: Create a Backup
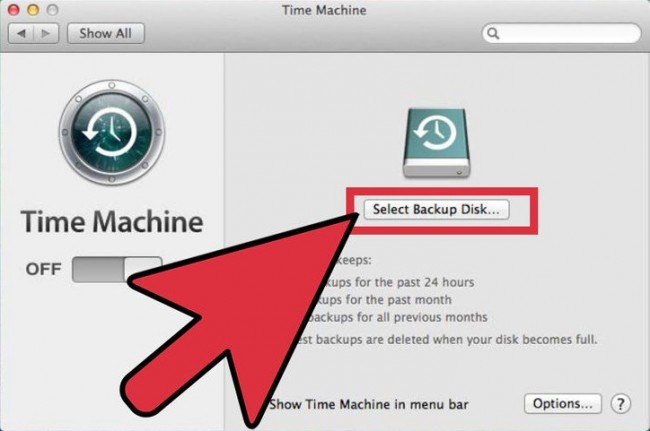
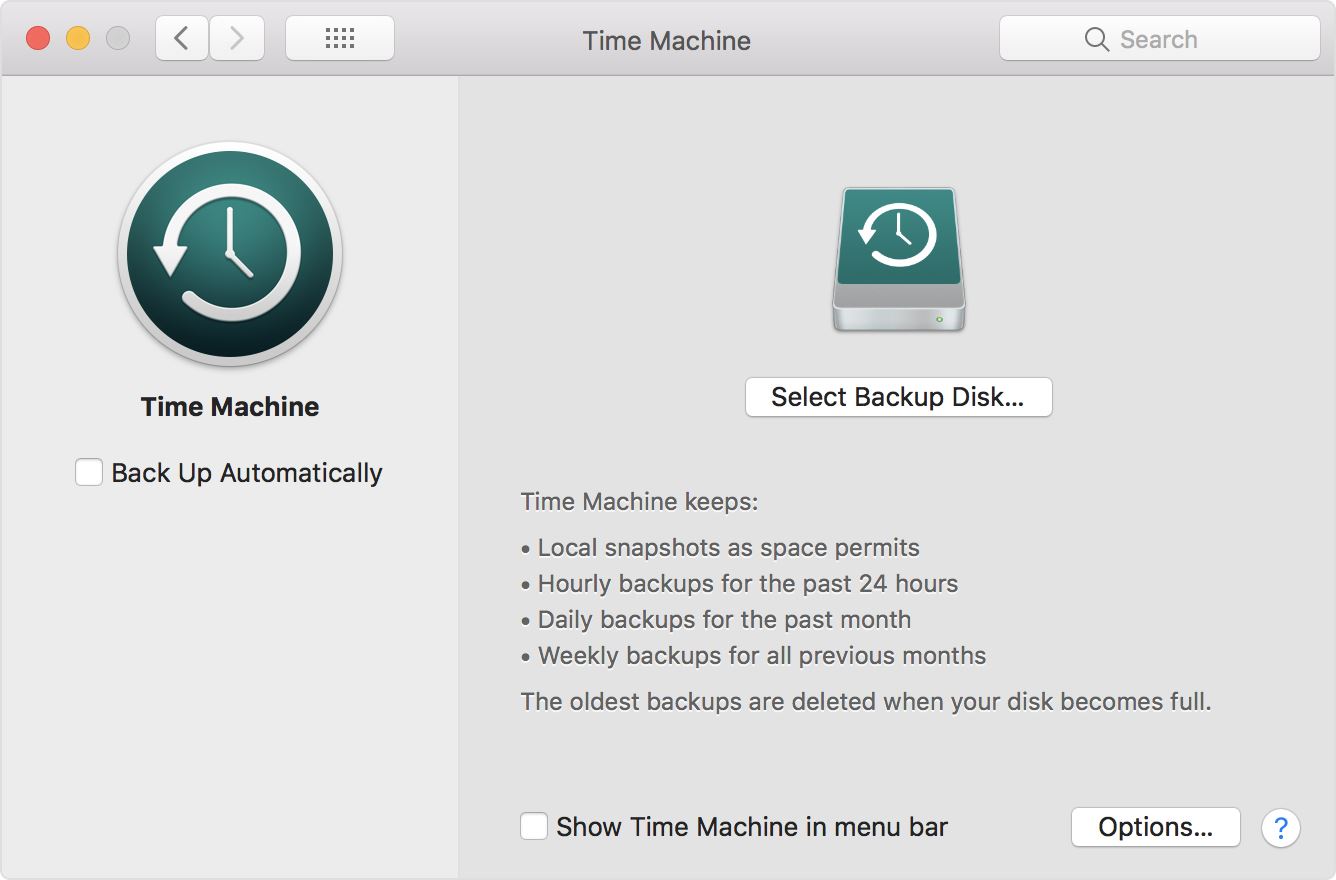
The first step in restoring your MacBook Pro is to create a backup of all your important files and data. This is crucial as it ensures that none of your data gets lost in the restoration process. You can create a backup by connecting an external hard drive to your MacBook Pro and using Apple's Time Machine backup utility to create a backup of all your files.
Step 2: Boot into Recovery Mode
The next step is to boot your MacBook Pro into recovery mode. To do this, you need to hold down the Command + R keys as soon as you turn on your MacBook Pro. This will take you to the macOS Utilities screen, where you can access the restore function.
Step 3: Erase Your MacBook Pro
Once you're in recovery mode, select the "Disk Utility" option and choose the internal drive of your MacBook Pro. Click on "Erase" and follow the on-screen instructions to erase your MacBook Pro's internal drive. This will erase all of your data and settings from your MacBook Pro.
Step 4: Reinstall macOS
After erasing your MacBook Pro, you'll need to reinstall macOS. This can be done by selecting the "Reinstall macOS" option from the macOS Utilities screen. Follow the on-screen instructions to install the latest version of macOS on your MacBook Pro.

How to Restore MacBook Pro without Data Loss
Step 1: Use Time Machine Backup
If you want to restore your MacBook Pro without losing any of your data, the best way to do so is by using the Time Machine backup. Time Machine backup allows you to create a backup of all your data, including your settings, documents, photos, and apps, on an external hard drive. Once you've created a Time Machine backup, you can restore your MacBook Pro from that backup.
Step 2: Boot into Recovery Mode
Boot your MacBook Pro into recovery mode by holding down the Command + R keys as soon as you turn on your MacBook Pro. This will take you to the macOS Utilities screen, where you can access the restore function.
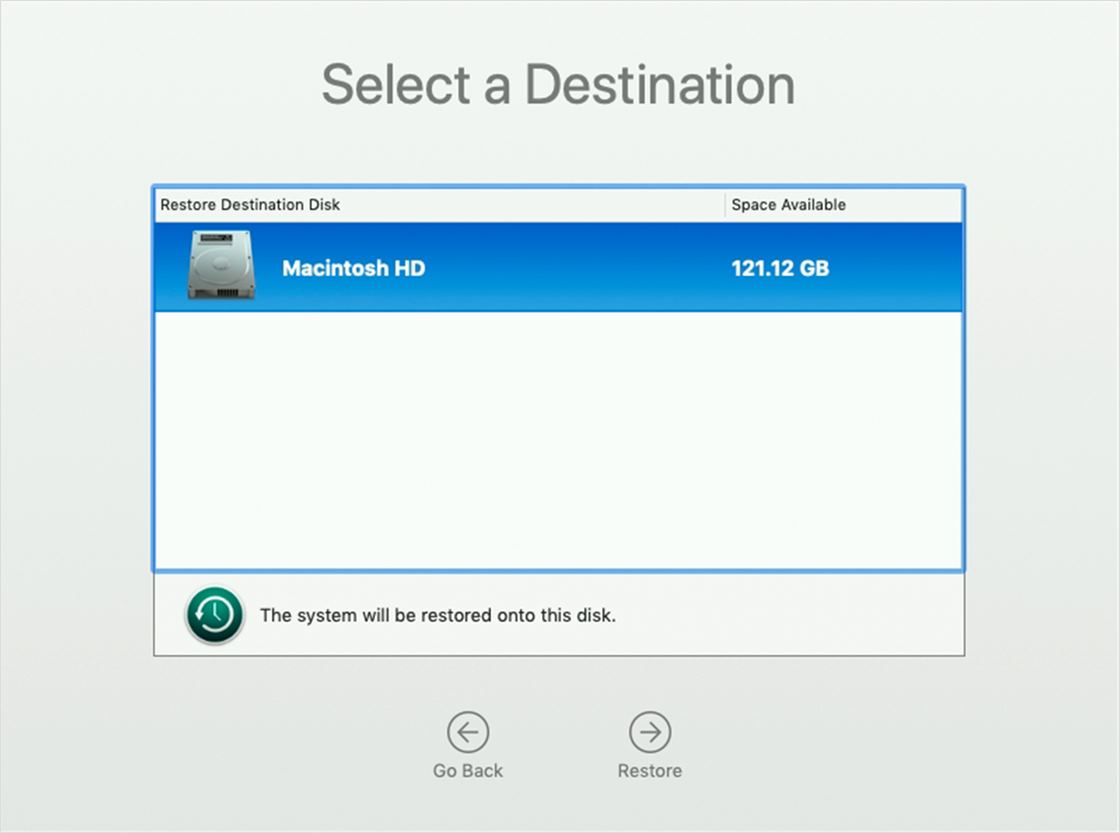
Step 3: Restore from Time Machine Backup
Select the "Restore from Time Machine Backup" option from the macOS Utilities screen. Choose the Time Machine backup that you want to restore your MacBook Pro from and follow the on-screen instructions to restore your MacBook Pro without losing any of your data.
How to Boot Mac into Recovery Mode without Data Loss
Step 1: Shut Down Your MacBook Pro
Shut down your MacBook Pro completely by holding down the power button for a few seconds. Wait for a few seconds before proceeding to the next step.
Step 2: Press Command + R Keys
Press the Command + R keys on your MacBook Pro as soon as you press the power button to turn it on.
Step 3: Wait for macOS Utilities Screen
Wait for your MacBook Pro to boot into recovery mode. This may take a few minutes. Once it is in recovery mode, you'll see the macOS Utilities screen.
How to Restore a Macbook Pro: 15 Steps (with Pictures) - wikiHow
Step 1: Back Up Your Data
The first step in restoring your MacBook Pro is to create a backup of all your important files and data. This is crucial as it ensures that none of your data gets lost in the restoration process.
Step 2: Boot into Recovery Mode
Next, you need to boot your MacBook Pro into recovery mode. To do this, you need to hold down the Command + R keys as soon as you turn on your MacBook Pro.
Step 3: Erase Your MacBook Pro's Hard Drive
Select the "Disk Utility" option and choose the internal drive of your MacBook Pro. Click on "Erase" and follow the on-screen instructions to erase your MacBook Pro's internal drive. This will erase all of your data and settings from your MacBook Pro.
Step 4: Reinstall macOS
After erasing your MacBook Pro, you'll need to reinstall macOS. This can be done by selecting the "Reinstall macOS" option from the macOS Utilities screen. Follow the on-screen instructions to install the latest version of macOS on your MacBook Pro.
That's it, folks! We hope this guide helps you restore your MacBook Pro and enjoy its speedy performance once again. Remember to always create backups of your data before making any major changes to your Macbook Pro. If you have any questions or concerns, feel free to drop them in the comments below. Until then, happy restoring!
Find more articles about Restore On Macbook Pro
Post a Comment for "Restore On Macbook Pro"