Screen Recording On Macbook Pro
If you're a Macbook Pro user and need to record your screen for work, school, or just for fun, you're in the right place! Screen recording can seem like a daunting task, but it couldn't be easier on a Macbook Pro. With these helpful tips and tricks, you'll be recording your screen in no time.
Screen Recording Made Easy on Mac
Step 1
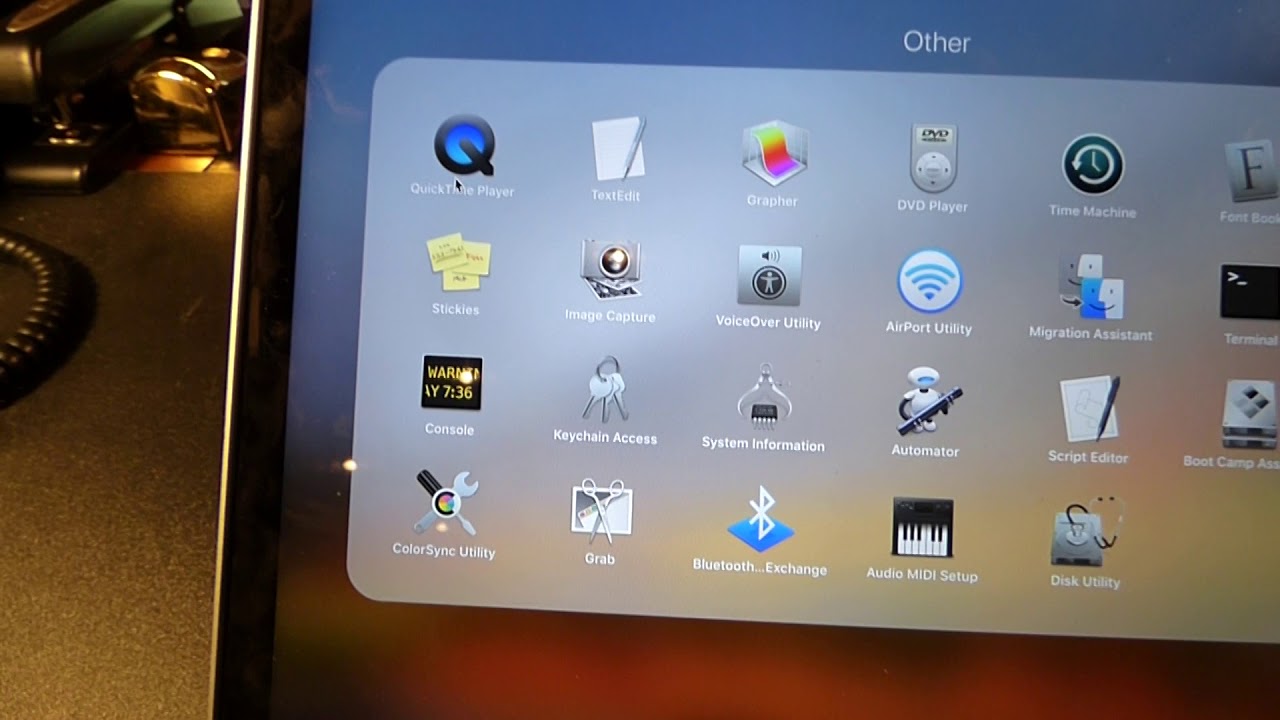
First, open the "QuickTime Player" application on your Mac. This should be located in your "Applications" folder. Once the application is open, click on "File" in the top menu bar and then click "New Screen Recording."
Step 2
Next, a small "Screen Recording" window will appear. Before you start recording your screen, click on the small down arrow next to the red record button. Here you'll find options to select your microphone source, choose to show mouse clicks, and more.
Step 3
Now it's time to press the red record button and start recording. When you're done recording, click the stop button, located in the menu bar, or press the "Command + Control + Escape" keys on your keyboard.
Webcam Troubleshooting on Mac
Step 1
If you're having trouble with your webcam on your Macbook Pro, try opening the "Photo Booth" application to see if your camera is working. If you're still having issues, make sure your camera is not being used by another application.

Step 2
If your camera is still not working, try restarting your computer. This can often fix minor issues with your computer's hardware.
Tips for Screen Recording on Mac
Now that you know how to record your screen on your Macbook Pro, here are some extra tips to make your recordings even better:
- Make sure you have enough free space on your computer to save your recordings.
- Record in a quiet environment to minimize background noise.
- Speak clearly and concisely when recording audio.
- Consider using an external microphone for better audio quality.
- Use keyboard shortcuts to start and stop recordings quickly.
Ideas for Screen Recording on Mac
Screen recording on your Macbook Pro can be used for a variety of purposes. Here are just a few ideas:
- Record video tutorials for your YouTube channel or website.
- Record a demonstration of a new software application.
- Record a video call with colleagues or friends.
- Record a game walkthrough or gameplay for a gaming channel.
- Record and share a slideshow presentation.
How to Edit Your Screen Recordings on Mac
After recording your screen on your Macbook Pro, you might want to edit your recording before sharing it. Here's how to edit your screen recordings using iMovie:
Step 1
Launch the iMovie application on your Macbook Pro. Click on "Create New" and then select "Movie."
Step 2
Import your screen recording into iMovie by dragging and dropping it into the application or clicking on "Import Media."
Step 3
Use the editing tools in iMovie to trim your recording, add transitions, and more. When you're done editing, click on "File" in the top menu bar and then click "Export" to save your edited recording.
There you have it! Recording your screen on your Macbook Pro is as easy as one, two, three. With these helpful tips and tricks, you'll be recording, editing, and sharing your screen recordings in no time.
Read more articles about Screen Recording On Macbook Pro
Post a Comment for "Screen Recording On Macbook Pro"